BMC Remedy (v7,8 and 9)
This section describes the integration into BMC Remedy by means of the BMC Remedy Java API which can be used to integrate all versions of BMC Remedy deployed "on premise". For Remedy Versions 9 and above, and Remedy Cloud Deployment models, please refer to section "BMC Remedy v9 and BMC Helix" which is another option to communicate with BMC Remedy via REST Web Services APIs.
For integration into BMC Remedy, you need to adjust the basic settings of a BMC Remedy target in Clip ( "<arsTarget/>"). You can choose between an integration into the
- BMC ITSM Incident Management application ( example target "BMC_ITSM" ) or
- your custom BMC Remedy application – Clip comes with a Demo form to quickly showcase how this type of integration can be accomplished ( example target "BMC_Demo" )
The "createARS" and "updateARS" sections in a Clip target for Remedy define how Clip should create and modify a Remedy incident, respectively. The standard settings for the example targets do not have to be modified for an out-of-the-box integration, however.
Supported Versions
Please assure that the system you intend to integrate meets the version requirements outlined in the table below.
| Product | Supported Version |
|---|---|
| BMC Remedy | 7.X |
| BMC Remedy | 8.X |
| BMC Remedy | 9.X |
System Preparation
The minimal requirement to integrate into BMC Remedy is to create an account that Clip uses to connect and to read, update and create entries in the BMC Remedy form specified in the "Connection Settings".
In addition, there are two options to synchronize incident updates to the peer system:
- polling: using this option, Clip periodically checks for updated incidents, communication is initiated from the CLip end, no further configuration in BMC Remedy needs to be done
- filter: a BMC Remedy filter is uploaded into BMC Remedy. It executes asynchonously when incidents are updated and communicates to Clip by means of Web Services to cause the backsync. For backsync using the "Remedy filter" option, please refer to "Backwards Synchronization with Remedy Filters"
Clip Target Configuration
Connection Settings
On the Clip Server, edit the configuration file [CLIP]/conf/ClipConfig.xml The following mandatory attributes exist for a BMC Remedy target , they must be customized:
- "name": the name of the Remedy Target is used as a reference in the "integration" section and is also used to reference the target for backwards synchronization. To report back BMC Remedy incident changes to Clip via a Remedy filter's WebService call, this target name is passed as the WebService call's parameter "A1_target".
- "server": this attribute needs to be set to the BMC Remedy (resolvable) server name or its IP address. Do not enter the URL to access Remedy in a browser here!
- "port": the port number of your Remedy server. If your Remedy Server uses the portmapper, use port number "0". This port can be looked up by your BMC Remedy System Administrator in the "BMC Remedy AR System Console" → "General" → "Server Information" → "Ports and Queues" . Please note that this is the Remedy server port, not the port of the "Mid tier" ( e.g. 8080 ) used in a URL to access Remedy in a Web browser.
- "form": specifies the BMC Remedy submission form that Clip uses to create an incident.
- For an integration into the standard BMC Remedy ITSM Incident Management application, the example target's "BMC_ITSM" setting for the "form" attribute is "HPD:IncidentInterface_Create"
- For an integration into AppLink's demo form, the example target "BMC_Demo_OMi" specifies the demo form name "AppLink:Clip:HPBSMOMiDemo".
- "user": Clip connects to the BMC Remedy server with the account configured in the "user" attribute. Please specify a user that has permissions to connect, create and update entries in the forms configured.
- "passwd": specify the password to log on to the ARS Server. In the example configuration, the password for user "Demo" is an empty string. The password can be entered in clear text or as an encrypted value. To encrypt the password, use the password encryption in the "Configuration" tab of the Clip Web interface:

The following optional attributes exist:
- "retryIntervalSecs" (optional, default: 30): the "retryIntervalSecs" attribute defines the time interval for Clip to retry a connection to this target if the connection is lost.
- "updateCalcDelta" (optional, default: false): this attribute controls the Clip behavior once Clip receives an update for a modified incident. If set to "true", Clip reduces the list of received name/value pairs to those with modified values compared to the last known value.
- "uploadForm": for use of an custom and Clip Demo form, this attribute can be used to specify a filename containing BMC Remedy form and filter definitions which are automatically uploaded to the BMC Remedy server on Clip startup. Please note that for this feature to work, the specified user in the "user" attribute needs appropriate permissions. Before upload, Clip replaces all occurances of [RL_HOST] and [RL_PORT] with the Clip hostname and port. The upload file is expected in the directory [Clip]/apache-tomcat-x.x.xx/webapps/Clip/conf .
- "downloadForm": for use of an custom and Clip Demo form, if specified, this filename is used to make a backup copy of the form defined in the "form" attribute. The file is created by Clip on startup in the directory [Clip]/conf
- "fieldListReadBackAfterCreate": by default, if this attribute is not configured, Clip uses the entry ID of the newly created entry ( form field #1 ) in the BMC Remedy form specified in the "form" attribute as the ID for the new incident ( for MF OBM integrations, the ID is displayed in the OBM "Forwarding Tab" as the "external ID" ). However, for BMC applications that determine the incident ID during workflow execution once an entry has been created in the submission form, the incident ID needs to be looked up by Clip after the creation of the entry. Therefore, the attribute "fieldListReadBackAfterCreate" contains a comma separated list of fields which Clip reads back after creating the entry. The first field in this list must contain the unique incident ID.For an integration into BMC Remedy ITSM Incident Management (submission form "HPD:IncidentInterface_Create" ), Clip uses this field list implicit:
![]()
- Field # 1000000161 : Incident Number
- Field # 1000000162 : Urgency
- Field # 1000000163 : Impact
- Field # 1000000164 : Priority
- Field # 1000000217 : Assigned Group
- Field # 1000000218 : Assignee
- Field # 7 : Status
- "useIgnoreCounter" ( default : "false" ): Modifications of BMC Remedy Incidents are reported back to Clip by means of a filter which is executed when an incident is created, modified, closed or deleted. To prevent Clip to backsync incident changes which were caused by Clip itself, the "useIgnoreCounter" Attribute can be set to "true": this will cause Clip to increase a counter per Incident on every modification initiated by Clip and ignore BMC Remedy Incident modifications equal to counter.
To synchronize BMC Remedy Incident changes to the peer system by means of the Clip "polling" option, the following attributes are relevant:
- "incidentPolling": set this attribute to "true" to enable incident polling for updates
- "incidentPollingIntervalSecsChange": set this attribute to adjust the polling interval in seconds
- "incidentPollingQualifier": the qualifier to determine the Remedy Incidents which are queried, e.g. ('Submitter' = "clip" AND 'Status' != "Closed" )
To synchronize new BMC Remedy Incidents to create e.g. MF OBM events ( BMC Remedy as the source system), the following attributes are relevant:
- "incidentPollingForNew": set this attribute to "true" to enable polling for new incidents
- "incidentPollingIntervalSecsNew": set this attribute to adjust the polling interval in seconds
- "incidentPollingForNewQualifier": the qualifier to determine the Remedy Incidents which are sync'ed
An example template for an integration between BMC Remedy as source system and MF OBM can be found at [Clip]\apache-tomcat\webapps\Clip\conf\ClipConfig_New_RemedyToMFOBM.xml. By applying it, new, filtered BMC Remedy incidents cause creation of MF OBM events and both entities are bi-directionally updated.
Synchronization Settings
Clip supports an integration into BMC ITSM, an example integration configuration is contained in the Clip default configuration file, please use the standard integration using the target "BMC_ITSM".
Clip recognizes integrations into BMC ITSM by the form name used in the target of type "arsTarget". For the target "BMC_ITSM", Clip uses according to BMC's recommendation the interface form named "HPD:IncidentInterface_Create" to
- create the ticket, it fills the fields configured in the "createARS" section of the target definition.
- Clip automatically determines the Incident ID and queries the populated fields of the final incident after the workflow to create the incident is completed.
- All subsequent updates to the ticket are done via the interface form "HPD:IncidentInterface as configured in the "updateARS" section of the target definition
Backwards Synchronization with Remedy Filters
Backwards synchronization - changes of Remedy incidents cause an update of the peer side event or incident to close the causing event - can be achieved by means of BMC Remedy Filters that are invoked whenever an incident is modified.
In contrast to the "polling" option introduced with Clip V5.08 that runs periodically and is initiated from the Clip side, the BMC Remedy filter runs "asynchronous" at the time when the incident is modified.
Backsync via BMC Remedy Filter is achieved by execution of a Clip WebService, no extra utility or command line tool is needed for this method on the BMC Remedy server.
To enable backwards synchronization by means of Remedy filters your BMC Remedy administrator needs to import the filters for Clip into BMC Remedy using the BMC Remedy Developer Console and importing one of these files:[Clip]\apache-tomcat\webapps\Clip\conf\Clip_for_BMCRemedy_IncBacksyncFilters_WS.xml
or alternatively[Clip]\apache-tomcat\webapps\Clip\conf\Clip_for_BMCRemedy_IncBacksyncFilters_WS.def
Before uploading the import file into BMC Remedy, please apply the following changes to the filter "ClipIntegration:HPD:IncidentModified" by editing the file:
- Replace the Clip server name which defaults to "clipsrv" with your Clip server name and verify that it can be resolved on the BMC Server ( two occurances ):
![]()
![]()
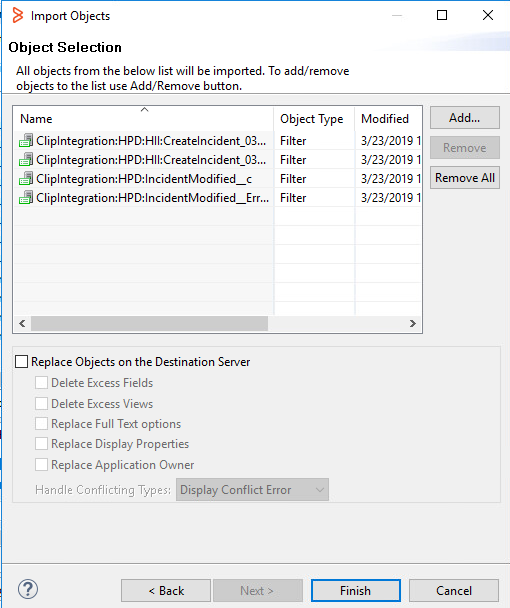
You need to copy the import file to your BMC Remedy system and import it using the "BMC Remedy Developer Studio" via "File->Import", then choose import source "Object Definitions", select the Remedy server, the import file and all objects:

The filter is executed whenever an incident is modified, but it will do a backsync only if the user doing the change is not the user that submitted the incident ( clip ). The purpose for this "run-if" qualification ( 'Submitter' != $USER$ ) is to prevent to do a backsync for changes that were done by Clip itself. Therefore, testing backsync by doing incident changes with the "integration user" ( clip) is not possible !
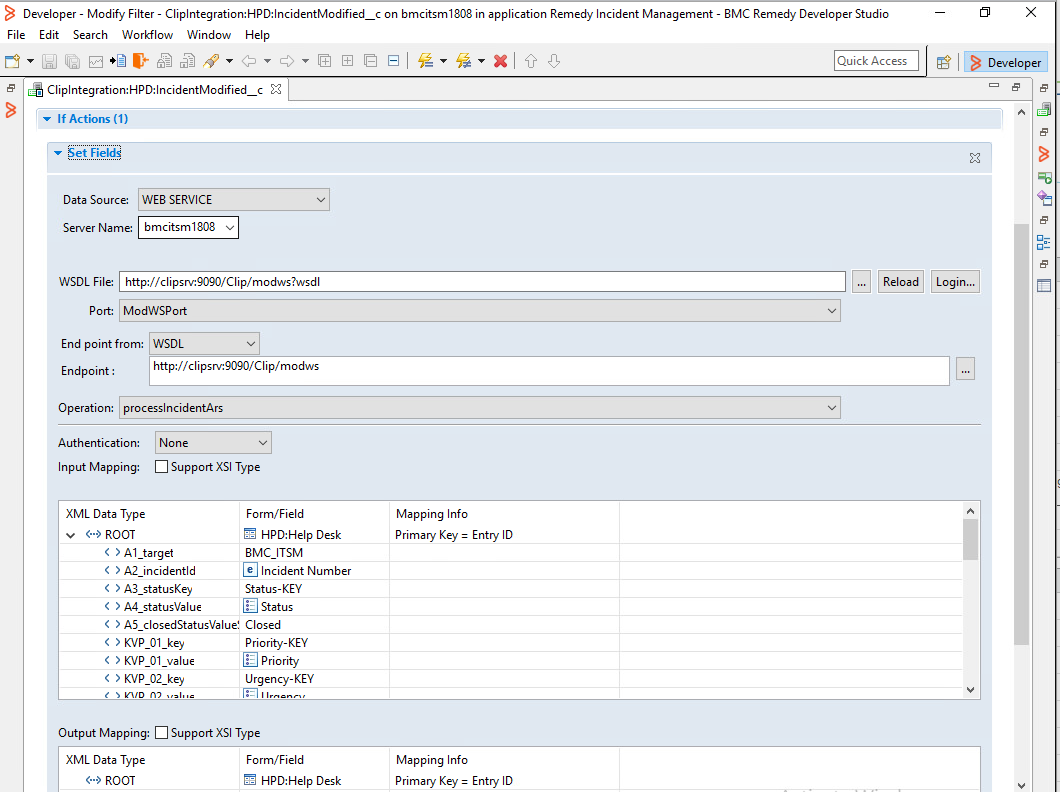
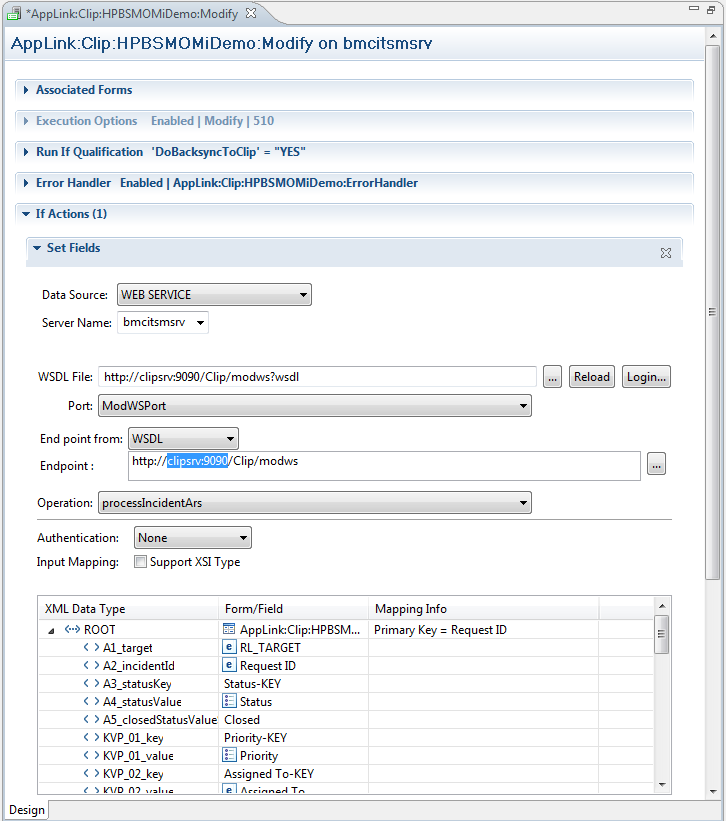
The Web Service call executed by the filter "ClipIntegration:HPD:IncidentModified" has the following properties:
- Do not use the "Reload" button: even though you are asked "Do you want to preserve existing mappings ?", answering "Yes" in some Remedy versions leads to cleared "Key" fields, a re-import can be done to recover the settings
- As an alternative for editing the Clip servername in the export/import file, the URL's for "WSDL File" and "Endpoint" can be edited in the "Set Fields" dialogue
- Key/Value pairs consist of a
- Name for the attribute, referenced by name appended with "-KEY"
- Value for the attribute, referenced by a BMC Remedy form field or a static string
- The Web Service call parameters include
- Parameters with prefix "A", these are mandatory attributes
- A1_target: the Clip target name for the modified incident
- A2_incidentId: the Clip incident Id
- A3_statusKey: the name of the attribute holding the incident status
- A4_statusValue: the current status of the incident
- A5_closedStatusValueString: if the status attribute has the value of the "A5_closedStatusValueString", it is considered as "closed" by Clip
- Parameters with prefix "KVP" – these define the key / value pairs to backsync to Clip
- Example:
- KVP_01_key: "Priority-KEY"
- KVP_01_value: "(Field) Priority"
- Example:
- Parameters with prefix "A", these are mandatory attributes
Clip Demo or custom form
The Clip default installation provides a sample BMC Remedy form and sample filters to provide an out of box integrated solution that can be used to quickly demonstrate the synchronization features:
As an example for an integration into Micro Focus OpsBridge, the BMC Remedy import file [CLIP]\apache-tomcat-X.X.XX\webapps\Clip\conf\CLIP_for_BSM_OMi_BMCRemedyDemoForm.def contains:
- The Form "AppLink:Clip:HPBSMOMiDemo" provides fields with predefined mappings in the Clip configuration file to show example mappings from OMi event attributes to fields in the demo form along with Status and Priority mappings.
- Based on the Demo form, the following filters are predefined to provide backwards synchronization for modified ARS tickets:
- Example filters for backsync via Clip WebService interface (enabled):
- AppLink:Clip:HPBSMOMiDemo:Modifythis filter synchronizes back the values of ticket attributes of tickets that have been modified
- AppLink:Clip:HPBSMOMiDemo:ErrorHandlerthis filter acts as an error handler and is referenced in the filter "AppLink:Clip:HPBSMOMiDemo:Modify".
- Example filters for backsync with "curl" (disabled by default):
- AppLink:Clip:HPBSMOMiDemo:Modify_Curl this filter synchronizes back the values of ticket attributes of tickets that have been modified
- AppLink:Clip:HPBSMOMiDemo:TicketClosed this filter informs Clip that a ticket has been closed. This causes Clip to move the incident from the active to the closed list of incidents and potentially close the OMi event.
- AppLink:Clip:HPBSMOMiDemo:Delete this filter informs Clip that a ticket has been deleted. This causes Clip to move the incident from the active to the closed list of incidents and potentially close the OMi event.
- Example filters for backsync via Clip WebService interface (enabled):
- Example Demo form filter "AppLink:Clip:HPBSMOMiDemo:SetIncID (enabled):This example filter can be used to demonstrate the use of attribute "fieldListReadBack" described above. On incident creation in the Demo form, this filter sets field 100000039 ( "Incident Number" ) to "INC_" followed by the Micro Focus OpsBridge event uuid. To use this value as the Incident Number for Clip and display in OMi, configure "fieldListReadBack"
![]()
The BMC Remedy import file for the Demo form and filters can be reviewed and imported manually. Alternatively, it can be uploaded by Clip by setting the "uploadForm" attribute in the ARS Target definition to "CLIP_for_BSM_OMi_BMCRemedyDemoForm.def".
Create and update settings
In a BMC Remedy <arsTarget/> target definition, the sections "<createARS/>" and "<updateARS/>" define how Clip should create and update a BMC Remedy incident, respectively. These settings do not need to be changed if the Clip Demo form of the default installation is used to use the out-of-the-box integration.
The settings to create an incident are defined under the tag "<createARS/>", whereas the update settings are defined under the tag "<updateARS/>". For both sections, the content has the same syntax: a list of ARS form fields to be used for ticket creation or modification.
A simple ARS form field definition just defines a default value:
![]()
A form field definition defines the ID of the ARS field to be filled or updated. The default value describes the value for the field. It can include Variables ( [variablename]), that refer to attributes of the corresponding OMi/NNMi event. Please refer to Exhibit B for a list of OMi event attributes that can be used.
A field definition in the "updateARS" section can specify the "updateMode", which is either overwrite (default) or append. In case of "append", Clip retrieves the existing value of a field and appends the current value to it:

A conditionlist can be used to derive the value for the ARS field based on OMi event attribute values to allow value mappings. If no condition of a condition list matches, the default value will be applied. If no condition of a condition list matches and there is no default value, the field will be ignored in a create / update:

In some cases it makes sense to set multiple fields if some condition matches. This can be achieved using fieldsets.
All fieldsets are defined within a <fieldsetlist> Tag. Every fieldset is identified by a unique name and has a <conditionlist> section. The first fieldset's conditionlist that is matched causes all configured fields of the fieldset to be evaluated during the ticket creation process.
An important rule is that only the first matched fieldset is evaluated. All subsequent fieldsets are ignored. Therefore the order of the fieldsets within a fieldsetlist is important.
A form field definition in Clip does not specify a datatype for it even though each field in ARS has a certain data type. Clip retrieves all field definitions from the configured form before it creates or updates an incident. Clip converts a value to the correct datatype before a field value is set or updated. Clip supports the following ARS field datatypes to create or update incidents:
- Char - for Strings that exceed the maximum character length of a field, Clip truncates strings and appends a trailer ("…")
- Diary
- Selection A field with datatype AR_DATA_TYPE_ENUM is set by specifying one of the allowed "Item Names". The list of valid "Item Names" can be reviewed in the Clip.log file at Clip startup time.
- DateTime
- Date
- Time
- Int
- Real
- Decimal
If you plan to configure Clip to submit events to a custom form, it is a good practice to configure the basic items like credentials, server name, form name for your ARS target and have Clip display all the fields of the form in the Clip.log file ( they are displayed as lines of loglevel "INFO" ). From here, you can review all field numbers, its datatypes and also all the required fields that must be configured.

For testing purposes with different datatypes, the Clip demo form contains a TAB „Misc" which allows you to add or update custom attributes of a synchronized OMi event which are then forwarded into ARS fields of the different supported datatypes.

Micro Focus OMi_NNMi / BMC Remedy and the CLIP Demo Form
CLIP comes with a BMC Remedy Demo Form that can be used to demonstrate incident creation and bidirectional synchronization between events and incidents.
The predefined integration "MFOMi_BMCDemo" needs to be activated – it connects the two targets "MF_OMi_BMCDemo" and "BMC_Demo_OMi":

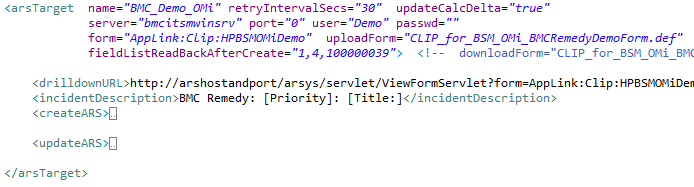
The BMC Remedy target "BMC_Demo_OMi" uses the "uploadForm" attribute to specify the filename containing BMC Remedy Demo form and filter definitions which are automatically uploaded to the BMC Remedy server on Clip startup.

Please note that for this feature to work, the specified user in the "user" attribute needs appropriate permissions.
Before upload, Clip replaces all occurrances of [RL_HOST] and [RL_PORT] with the Clip hostname and port. The upload file is expected in the directory [Clip]/apache-tomcat-x.x.xx/webapps/Clip/conf .
At CLIP startup, CLIP displays the file import status in the CLIP Web UI status tab:


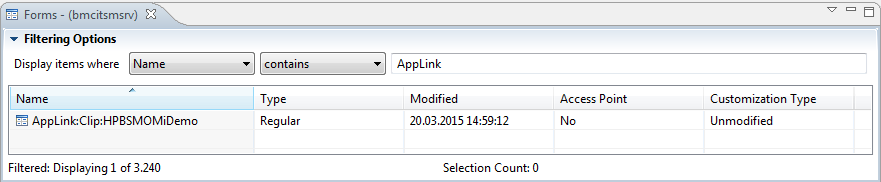
To verify that the following objects have been uploaded successfully, please open the BMC Remedy Developer Studio and locate the
- Demo Form "AppLink:Clip:HPBSMOmiDemo"
- Filters "AppLink:Clip:HPBSMOmiDemo:<operation>"
- activated for: "SetIncID", "ErrorHandler" and "Modify" (Backsync via WebService calls)
- deactivated for: for "Delete", "TicketClosed", ", "Modify_Curl" (Backsync via curl utility)

- Filter "AppLink:Clip:HPBSMOmiDemo:Modify" has the correct CLIP server hostname and port in the filter's endpoint and "WSDL file" setting:
- If you plan to import the Demo file to BMC Remedy not automatically, but manually via the BMC Remedy Developer Studio, you should remove the "uploadForm" attribute in the ARS target "BMC_Demo_OMi" and edit the import file and replace all occurrances (2) of [RL_HOST] and [RL_PORT] with the Clip hostname and port before the import.
Migration of a HP SPI for Remedy ARS rules file
Clip offers migration of HP SPI for BMC Remedy configuration to Clip, this involves the migration of the SPI's rules-file configuration to the ClipConfig.xml format.
Clip includes a migration tool that reads the HP SPI's rules-file and translates it to the configuration syntax of a ClipConfig.xml file. Since this is an automatic procedure and it is not possible to migrate all configuration items it is necessary to review the resulting ClipConfig.xml and adjust the configuration to the specific target environment.
In order to start the migration put the rules file into the folder
"[Clip]/migration/remedySPI/rules.txt"
and start the Clip server. During the startup process Clip automatically detects the rules.txt file and starts the migration. The resulting ClipConfig_Mig.xml is written into the same folder. Afterwards use this ClipConfig_Mig.xml as a template for the final ClipConfig.xml configuration.