Cherwell / Ivanti
To configure an integration into Cherwell Service Management, the following steps need to be performed:
- Configuring the Cherwell instance: usually, this task is performed by the Cherwell Administrator
- Create the "REST API client" and obtain its "clientId"
- Create the "Integration User"
- Create the customer that will be displayed in the "Requestor" field of an incident created by CLIP
- Configure the CLIP target of type Cherwell: usually, this task is performed by the CLIP Administrator. It requires the "cliendId", "integration user name" and "customer" gathered in step 1)
These two tasks will be described in more detail in the next two subsections.
Supported Versions
Please assure that the system you intend to integrate meets the version requirements outlined in the table below.
| Product | Supported Version |
|---|---|
| Cherwell (CSM) | 10.x ( or newer ) |
System Preparation
Configuring the Cherwell instance
CLIP's Cherwell integration requires the creation of a "REST API client" and an integration user that performs the required operations to create and update business objects within Cherwell and therefore needs certain permissions within the Cherwell platform.
The first step is to open the "Cherwell Service Management Administrator" tool and select the "Edit REST API client settings" link within the "Security" category.
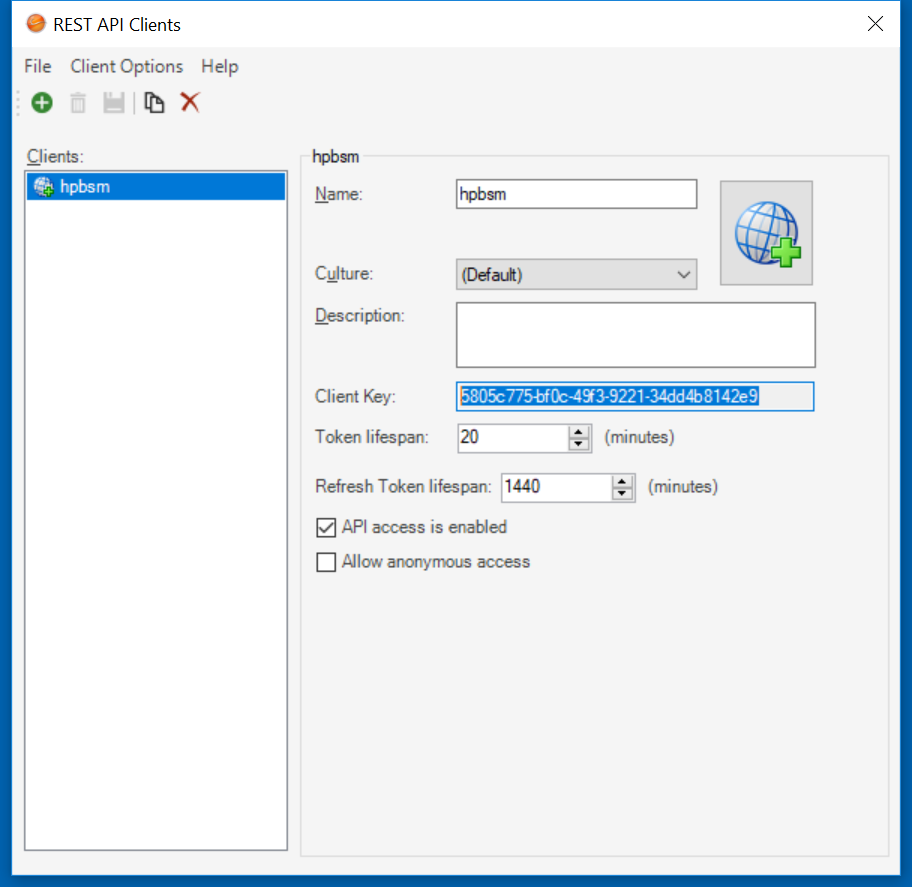
In the "REST API clients" dialogue window
- Click "Create new client"
- Type the name of the new client ( e.g. "hpbsm" )
- Leave the "Token lifespan" ( 20 minutes ) and "Refresh token lifespan" ( 1440 minutes ) unchanged
- Copy the "Client Key" ( ClientId ) so it is available in the second step, "Configuring the CLIP target of type Cherwell"
- Check the "API access is enabled" toggle button
- Leave the "Allow anonymous access" toggle button unchecked
- Press "Save the current client" and close the window
The second step is to create an integration user in the "Cherwell Service Management Administrator" tool – please select the "Edit users" link within the "Security" category and in the "Users" dialogue window
- Click "Create new user"
- Type the "Login ID" ( e.g. "clip" ) and copy it so it is available in the second step, "Configuring the CLIP target of type Cherwell"
- As "Security group", select "IT Service Desk Level 1". The "Security group" selected here must have the privileges to create and update records for the business object CLIP is supposed to manipulate ( e.g. "Incident" ). As an option, a new "Security group" can be created and assigned to the integration user.
- Provide the password and re-type it.
- Press "Save the current user" and close the window

- The third step is to create a customer in the "Cherwell Client" tool ( not the Cherwell Web client ) – please select the "Contact manager" menu option under the "Customer" menu item and click "New":
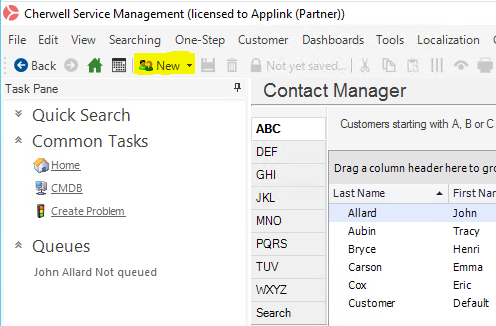
- Type "CLIP" as the "first name"
- Type "Integration" as the "last name"
- Save the changes.
Clip Target Configuration
On the Clip Server edit the configuration file conf/ClipConfig.xml – for the Cherwell integration it contains the example targets "MF_OMi2CSM" and CSM" integration "MFOMi_Cherwell" which needs to be activated:

For better readability of the config file, it is recommended to remove all other targets and integrations – a backup copy of the initial ClipConfig.xml can be found in file "[Clip]/apache-x.x.xx/webapps/Clip/conf/ClipConfig_New.xml".
This integration references the Cherwell example target "CSM":
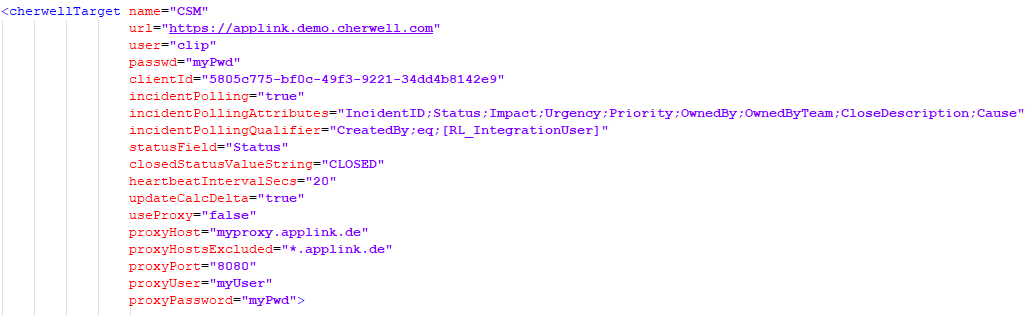
The following attributes have to be set in the Cherwell target definition:
- "name" Attribute of the target tag. For a standard integration, leave the default value "CSM" unchanged.
- "url" Attribute: type in the URL for your Cherwell instance ( e.g. https://applink.demo.cherwell.com )
- "user" Attribute: type in the integration user name for CLIP to log in to the Cherwell Instance as configured in step 1) above, e.g. "clip".
- "passwd" Attribute: type in the password to log in to the Cherwell Instance. The password can be entered in clear text or as an encrypted value. To encrypt the password, use the password encryption in the "Configuration" tab of the Clip Web interface:

- "clientId" Attribute: type in the "Client ID" ( Client Key ) as configured in step 1) above, e.g. "5805c885-bf0c-49f3-9221-34dd4b8142e9".
- Proxy settings: if outbound communication from Clip to Cherwell needs to be established via a proxy server, the following settings need to be configured. Please note that when changing proxy related settings, the CLIP service needs to be restarted, a "Reload Config" in the GUI does not make the new settings effective:
- useProxy: to use a proxy, set "useProxy" to "true"
- proxyHost: please specify the hostname of the proxy server
- proxyHostsExcluded: this optional attribute can be used to specify hosts which CLIP should not connect to via the proxy. Please note that if a proxy is used ( i.e. useProxy="true" ), this proxy is used for all connections that CLIP initiates, also for connections to OMi or NNMi. If connections to OMi or NNMi must not be initiated via the proxy, you have to use this attribute to exclude these hosts. The value for this attribute allows wildcards. As an example, if connections to all hosts in the domain "applink.de" should not use the proxy, set this attribute to : proxyHostsExcluded="*.applink.de"
- proxyPort: port to connect to the proxy server
- proxyUser: username to login into the proxy server
- proxyPassword: password for "proxyUser" to login into the proxy server. The password can be entered in clear text or as an encrypted value. To encrypt the password, use the password encryption from "Configuration" Tab of the Clip Server Web interface
In ClipConfig.xml, locate the setting for the field "CustomerDisplayName" in your Cherwell Target ("CSM") and set it to the value obtained in step 1) above without leading and trailing spaces:

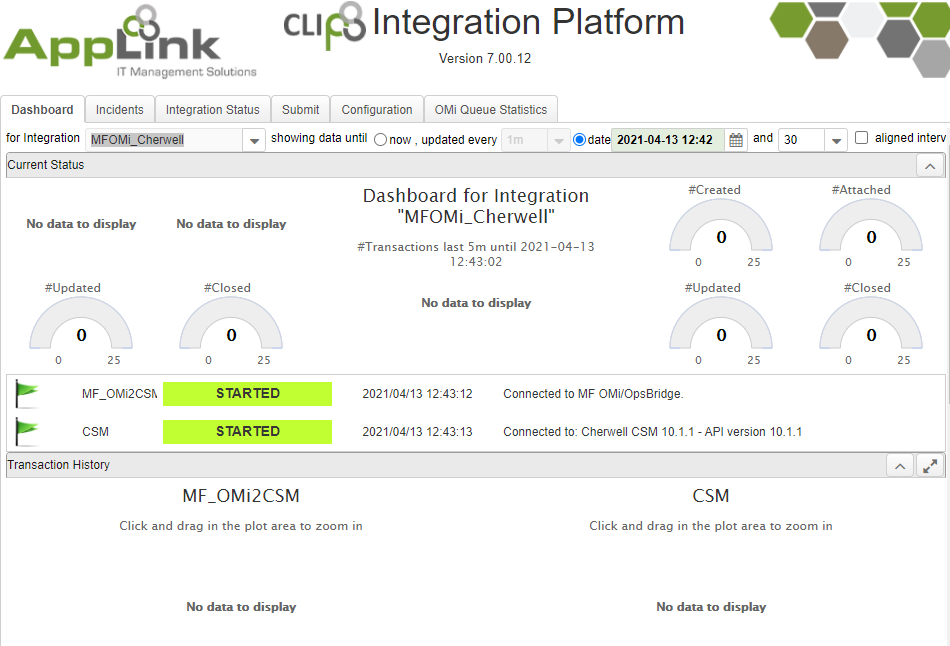
To check whether CLIP can connect to both ends of your Cherwell integration, please restart CLIP and check the connection status in the CLIP Web UI: