Getting Started
How to Configure
Configuration involves editing XML content. Configuration can be achieved in one of two ways:
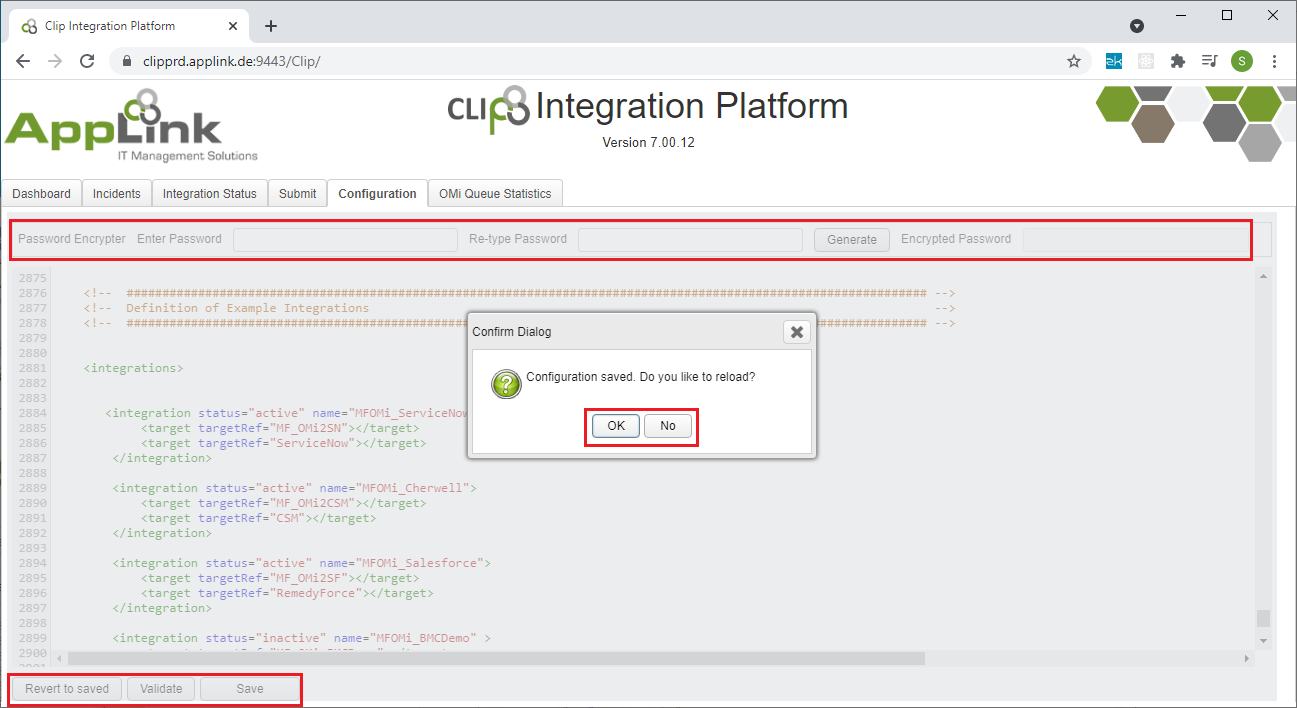
- Configuration in the CLIP Web UI "Configuration" TAB - this is a convenient way to make little adjustments and apply the changes quickly: perform the changes, then
- (optionally) "Validate" the content to assure it is syntactically correct
- Hit "Save" ( to once again validate the content and ), then Choose "OK" to reload and apply the configuration

- "Revert to saved" reloads the editor with the current configuration should you have done changes and wanted to revert back.
- The "Password Encryptor" is the tool to encrypt passwords so you dont have to enter them in cleartext when connecting systems. Type and re-type your password, then click "Generate" and copy the Encrypted password to the appropriate attribute when configuring a connected system.
- Edit the configuration file
[Clip]/conf/ClipConfig.xmlon the Clip server
For more extensive configuration tasks, it is recommended to edit the config file by means of an editor ( like Notepad++ on Windows or "vi" on Linux ) which may also support additional features like XML syntax highlighting. To apply changes, CLIP needs to be restarted.
What to configure
The XML configuration has a well defined structure and contains the following elements, in order :
- license : your license
- database : settings for the database, there is no need to change anything to get started
- targets : a list of predefined configurations for different types of systems. Each target definition provides information for Clip to specify how to connect to a system and how to receive, create and modify events, incidents or other artifacts. Each target has
- a type : this is determined by its element name, e.g. there are targets with element names <omiTarget/>, <bmcTarget/>, <snTarget/>, <cherwellTarget/>, ...
- a name : the target name is referenced by an integration
- a <create.../> element to define how new artifacts should be created
- an <update.../> element to define how artifacts should be updated
- integrations : each integration has an integration name and contains two references to targets in the target list by the target name. The first one is considered to be the source and the second one the destination. An integration can be set to "active" or "inactive" by setting the status attribute.
Activating preconfigured integrations
To activate a preconfigured out-of-the-box (OOTB) integration
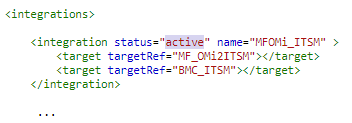
- identify the integration of interest in the list of example integrations at the very end of the configuration and set it to "active":

- Per integration, configure the mandatory basic settings for the two systems to integrate, therefore
- identify the two target names involved ( "MF_OMi2ITSM" and "BMC_ITSM" in the example )
- find the two targets referenced in the integration in the list of targets and configure the "basic" settings, like URL, server name, user and password. Depending on the system, please refer to the appropriate section in the chapter Setup .
- Save and apply the new configuration
- Review the Status Tab in the Clip Web GUI and start using the integration.
Integration Examples
Clip provides some example configurations out-of-the-box which are "inactive" by default, please note that the following list is not complete and does not show all integrations provided. To activate an example integration
- activate the integration as described in
- configure the "Connection Settings" for the two targets involved, follow the link of teh two "System Types" and review the documentation of each system type
| Integration Name | Description | Target Name | System Type | Artifact |
|---|---|---|---|---|
MFOMi_ITSM | Micro Focus Operations Bridge integration with BMC ITSM Forward OpsBridge events to BMC ITSM to create incidents and bi-directionally synchronize them. | MF_OMi2ITSM | MF OpsBridge | event |
| BMC_ITSM | BMC Remedy ITSM | incident | ||
| MFOMi_BMCDemo | Micro Focus Operations Bridge integration with BMC Remedy Forward OpsBridge events to and Remedy form to create entriesw and bi-directionally synchronize them. | MF_OMi_BMCDemo | MF OpsBridge | event |
| BMC_Demo_OMi | BMC Remedy | entry | ||
| MFOMi_ServiceNow | Micro Focus Operations Bridge integration with ServiceNow Forward OpsBridge events to ServiceNow to create incidents and bi-directionally synchronize them. | MF_OMi2SN | MF OpsBridge | event |
| ServiceNow | ServiceNow | incident | ||
| MFOMi_ServiceNowEvent | Micro Focus Operations Bridge integration with ServiceNow Forward OpsBridge events to ServiceNow to create events and bi-directionally synchronize them. | MF_OMi2SN | MF OpsBridge | event |
| ServiceNowEvent | ServiceNow | event | ||
| MFNNMi_ServiceNow | Micro Focus NNMi integration with ServiceNow Forward NNMi events to ServiceNow to create incidents and bi-directionally synchronize them. | MF_NNMi2SN | MF NNMi | alarm |
| ServiceNow | ServiceNow | incident |